


Exclusive offer: Free hardware, free shipping! You pay for software part only!
Recommended for:
- Trucks 2007-2010 model year with DPF aftertreatment without DEF injection and without ACM ( where it’s not possible to use Vilkus)
- Hidden installations onto trucks and machines 2010-2013 model years with DEF and DPF
In other cases we recommend to use Vilkus devices as they’re much easier in installation!
Main features:
- No DPF/SCR-related fault codes.
- No derates under any conditions.
- Half-tank of AdBlue on the display (if equipped).
- HCDEA™ – HamCom Dynamic Emulation algorithm.
- HCDMA™ – HamCom Direct Memory Access algorithm for total control of soot ratio values.
- Reversibility.
Compatibility:
- Volvo D11F, D13F, D16F 2007-2010.
- Volvo D11H, D13H, D16H 2010-2013.
- Mack MP7, MP8 2007-2013.
- UD Trucks with US11/US12 emission standard 2011-2014.
Have a question about compatibility? Contact us and we will check it!
In the kit:
- Emulator module: sealed metal box with 6-pin connector. Shockproof, waterproof dustproof, EMI-proof, non-serviceable electronic device.
- Installation cable: consists of waterproof connector and 6-wires silicone cable 3m length.
Legal framework usage of this equipment
This module is supplied as an alternative/aftermarket spare part (alternative control unit). According with Articles 110 (1), 8(1) CDR the spare part “Control unit” is not covered by spare part design protection as this is a “must-fit” part.
Customer’s exclusive right to choose spare parts manufacturer is protected by Articles 101 and 102 TEFU (aka Competition protection Act). This is NOT a safety-related spare part. Although end customers must not be limited in freedom to choose spare parts, usage this unit may cause to a warranty refusal. Refer to your warranty agreement with your truck/machine supplier before purchasing this product for warranty covered vehicles. Module internal hardware design and its software are the intellectual property of HamCom Electronics LLC and DrunkLab LLC and cannot be disclosed/distributed without an appropriate agreement.
Customer takes full responsibility for technical inspections and certification of his equipment regardless of parts he is using. We do not accept returns due to certification incompatibilities.
Although this equipment cannot cause any negative performance and safety effects, using of this device is customer’s own risk.
How to install
Installation manual for US07 trucks (Volvo/Mack D13F/D16F/MP7/MP8 DPF-only engine)
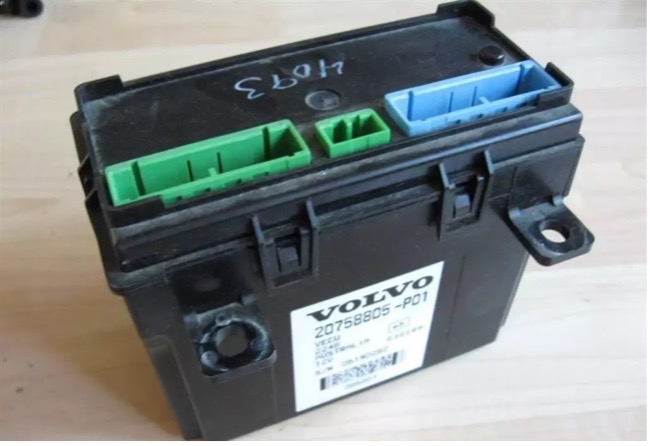
- Find the VECU (Vehicle electronic control unit) in your truck. Typical VECU is shown on the pictures below.

Usual location of VECU is inside of dashboard (central part), under main fuse panel - Connect the cable to vehicle harness near VECU in accordance with the following picture:
You may reduce the cable length if necessary. Do not enlarge cable length.

- Plug the connector to T-Box device. Switch the key ON, wait 2 minutes and switch it OFF. Note: No one diagnostic tool should be connected at this time!
- Disconnect all sensors from DPF including NOx sensor.Note: Do not disconnect upstream temperature sensor (before DPF), it is necessary for EGR functionality.
- Switch ignition on. Ensure that no DPF-related fault codes are active. If you see active codes related to DPF sensors check the cable connection. Remember that most of claims are due to improper connection. Contact us if you have any problem after this step. Prepare laptop with Tech Tool for troubleshooting.
Installation manual for US10/11/12trucks
- Find two NOX sensors. Typical sensor is shown on the picture. Disconnect them from your truck. Note that only one connector can be unplugged (on this picture it’s the right connector of the aluminum interface box).

- Find MID233 on the truck. It is shown on this picture. Disconnect the connector with wiring harness. Disassemble the connector to obtain access to the wires. Just remove the tie and cap from it. Now you see the 61-pin connector from the wires side. Pin numbers are printed on the connection side and on the module.

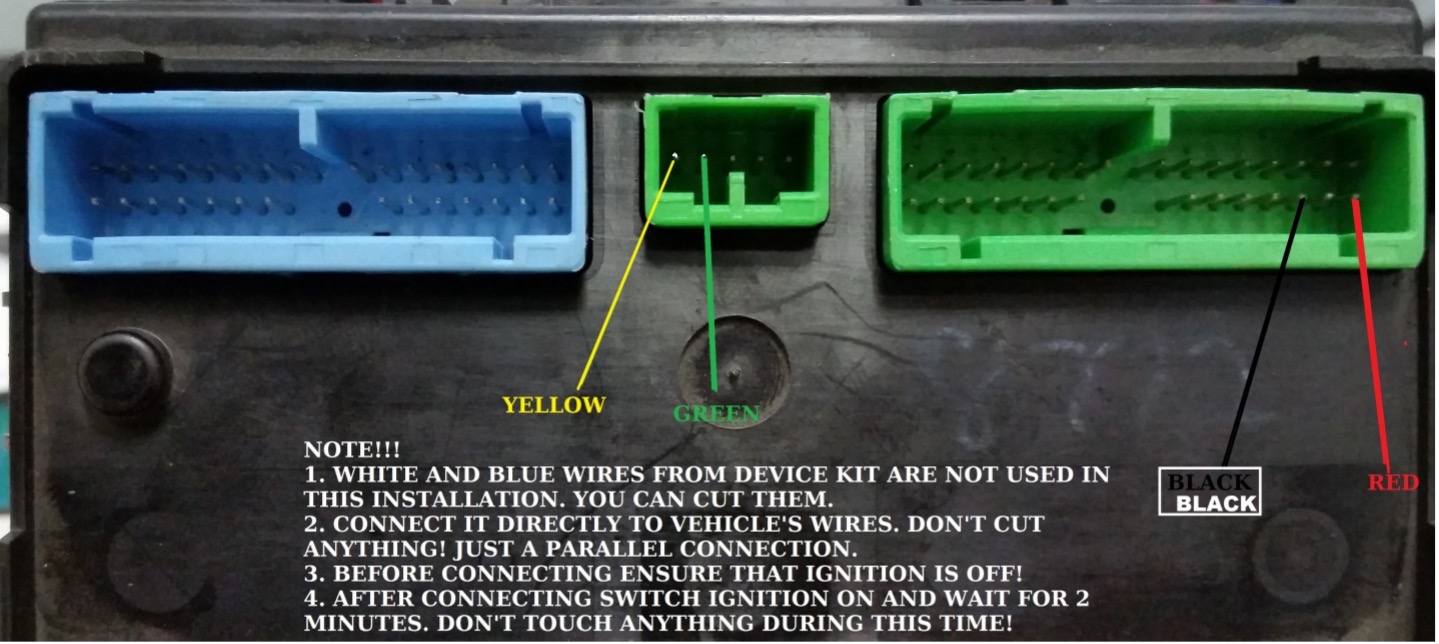
- Take the cable from the installation kit. Each wire has color marking. Now you should connect it to the vehicle’s wiring harness using the mapping table below. NOTE!!! You should CUT EACH WIRE that is described in this table and connect the cable to HARNESS side (not to connector side!). Cutting should be done because mid233 connector will be connected back to the ECU to avoid corrosion while mid233 should not work anymore.
| Color of marking tube | Number of pin where native wire connected |
| Red | 3 |
| Black | 57 |
| Yellow | 1 |
| Green | 5 |
| Blue | 10 |
| White | 14 |
- Assemble the connector, connect back to mid233, mount the cable to the place where box will be installed. It should be dry and safe place.
- Mount the box, screw it securely. The best position is connector-down.
- Connect the 6-pin connector to the box.
- Switch ignition ON, look at DEF level gauge. It should show approx. 2/3 of full tank level. Wait for 1 minute, switch ignition OFF.
- Now you can use the truck as always. NOTE!!! Please drill out all ceramics from DPF and DEF catalysts within 1000km to avoid soot clogging. This step is NECESSARY! Don’t forget to do it otherwise you may damage your exhaust manifold gasket or turbo!
- NEVER connect back NOx sensors and wires that you have cut from mid233!
Equipment requirements
- Basic hand tools.
- Experience of working with truck wirings and connectors.
- Multimeter and/or scope (in case of troubleshooting).
- Laptop with Tech Tool and communication interface (in case of remote support).
Warranty terms and conditions
This product is covered by D3LW™ program. D3LW is DrunkLab Limited Lifetime Warranty. Warranty policy is “return and replace”.
Note: We kindly ask you to be careful when connecting the device. Most of claims are due to wrong connection, installation onto an incompatible truck/machine, plugging into a wrong connector or truck harness faults.
VIN-lock warning! This device cannot be installed twice. Once connected to the truck/machine it will never work with different VIN. Please don’t use it for demo purposes!
Warranty cases are:
- Device stopped working fully or partially during usage period.
Non-warranty cases are:
- Mechanically damaged device and/or device connector.
- Removed stickers, serial numbers or trademarks.
- Corrosion signs due to unsealed or broken harness connector.
- Device abuse (high voltage, agressive moistures etc).
- Disassembling attempts and other copyright violations.
- Reverse engineering attempts or other copyright violations (may also cause your account blocking).
IMPORTANT: All warranty cases are processed manually by DrunkLab Support Team. If you have any problems with your device follow these simple instructions:
- Contact DrunkLab Support and create warranty request.
- Be ready to connect your vehicle with the faulty device to the Mochester 4 app for a detailed diagnostics procedure.
- Be ready to provide pics/videos of the faulty device to prove the device has no mechanical damage.
- Support engineer approves the warranty replacement of the device according to the diagnostics results and the provided photo/video materials.
Only logged in customers who have purchased this product may leave a review.

Reviews
There are no reviews yet.